


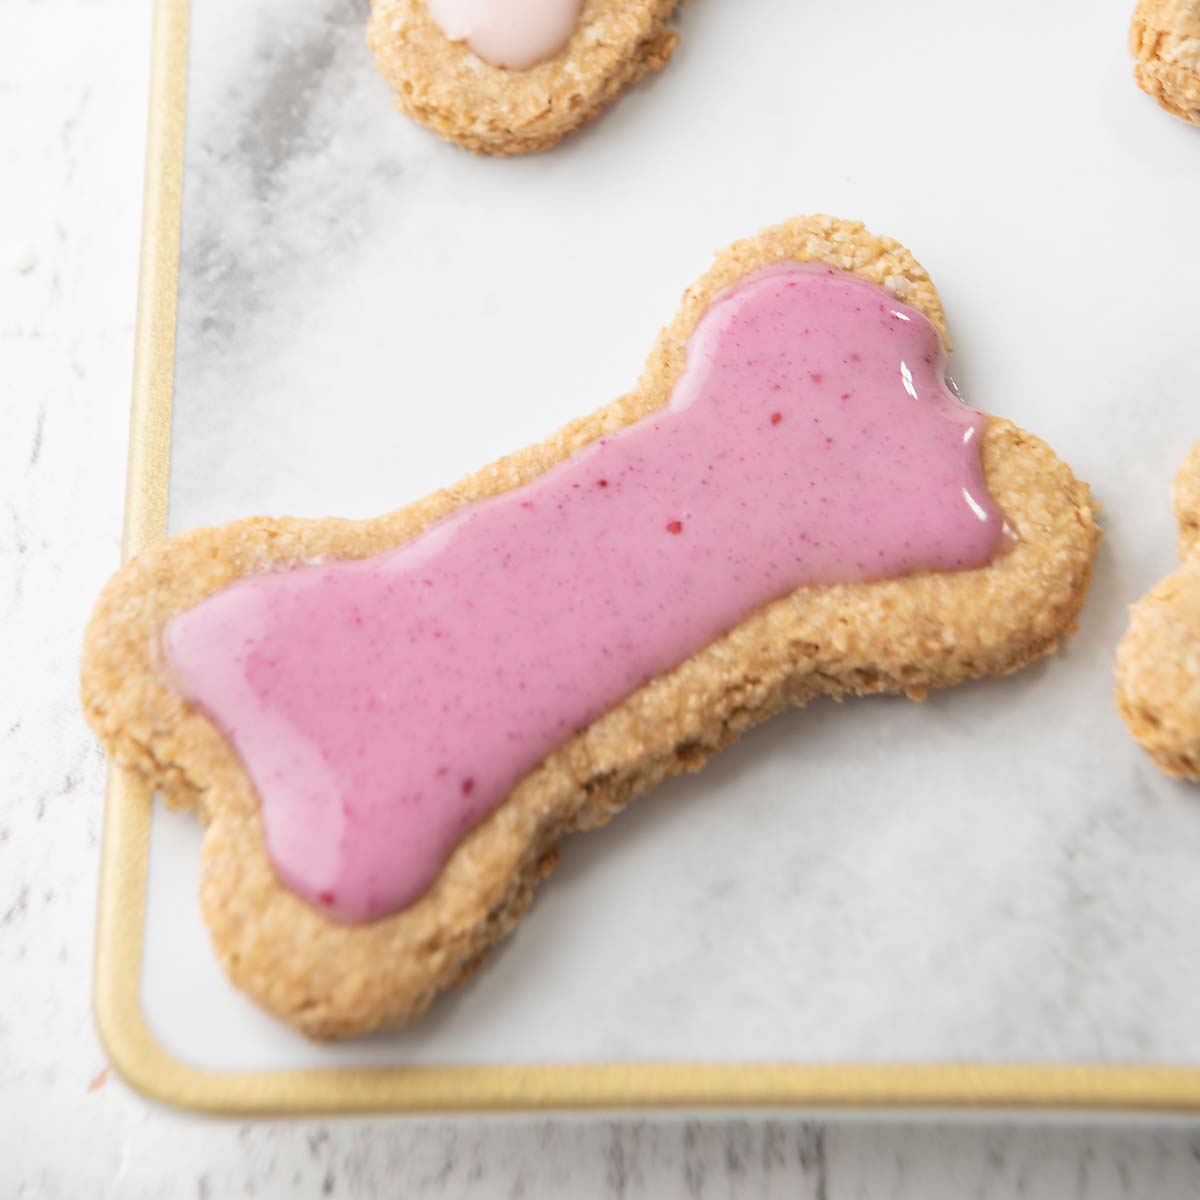
Dog cookies with icing are a fun homemade treat that look just as cute as they taste. These crunchy peanut butter cookies are made with simple ingredients dogs love and finished with a colorful drizzle of dog-safe icing.
If you enjoy decorating cookies, this recipe lets you make homemade dog cookies with icing using natural colors made from fruits and vegetables. The cookies bake up crisp and the icing sets quickly, making them perfect for sharing with your pup for holidays, birthdays, or everyday treats.
Once you learn how to make dog cookies with icing, you may find yourself baking batches just for fun.
FYI – This post contains affiliate links. As an Amazon Associate, I earn from qualifying purchases.
Why You Will Love This Recipe
Making decorated treats for your dog is a fun way to spoil them, and watching your pup happily crunch on something you baked yourself makes it even better. There are so many reasons this recipe will become a favorite.
Easy to Make – The cookies are made with a simple dough that rolls out easily so you can cut fun shapes using your favorite cookie cutters.
Wholesome Ingredients – These cookies are made with simple ingredients like peanut butter, applesauce, and oat flour. The icing is made with natural ingredients that create a dog friendly cookie icing without artificial dyes.
Customizable – You can decorate the cookies with different natural colors and adjust the icing thickness depending on how you want to decorate them.
Fun to Decorate – This recipe includes a simple icing made with honey and starch that creates a drizzle-style dog treat icing.
Ingredients and What They Bring to the Cookies
Let’s take a look at the simple, dog-safe ingredients that make these cookies both delicious and nutritious. Each one plays a role in making treats your pup will absolutely love! Here’s what you’ll need:
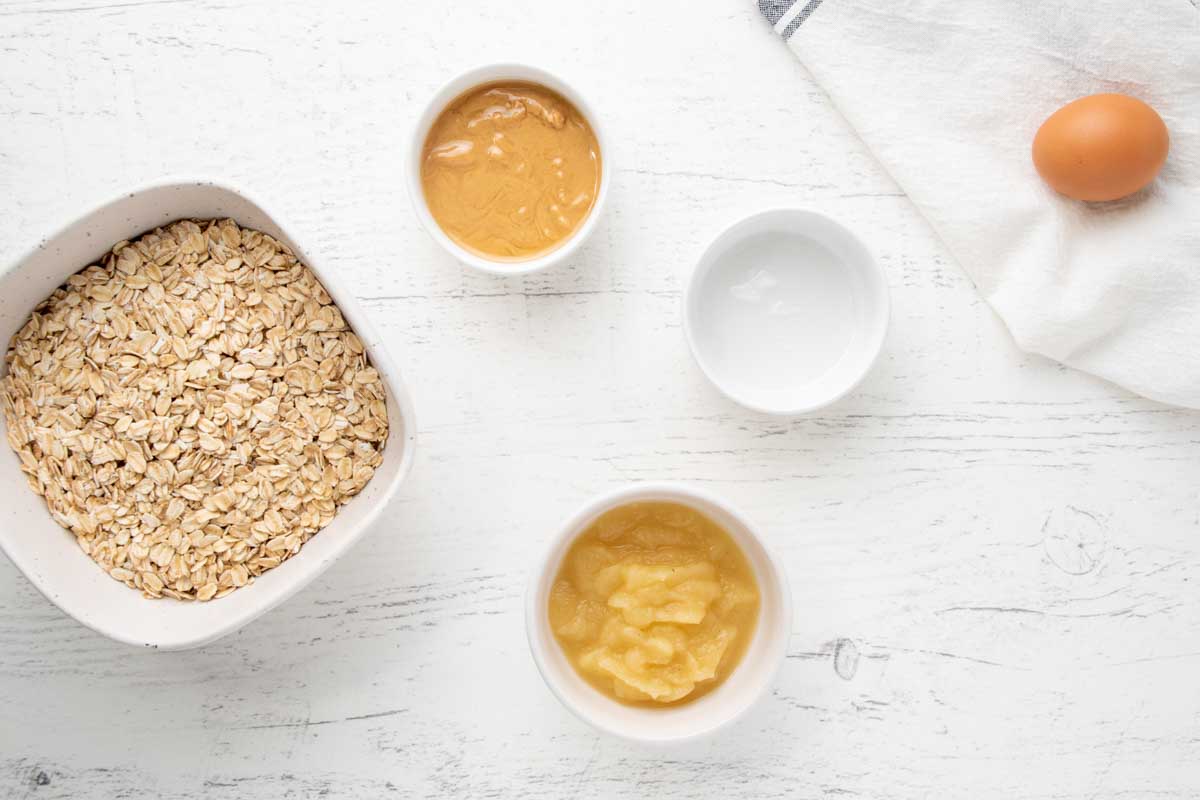
For the cookies:
- Peanut Butter is a good source of protein, minerals, and vitamins B and E.
- Applesauce adds moisture and a touch of sweetness
- Egg binds the dough and adds protein
- Coconut Oil has healthy fats
- Oat Flour is a gentle, dog-friendly flour. You can use oats to make oat flour (see notes below)
For the dog treat icing:
- Natural Coloring – can be fruit, vegetables, dog-safe food powder, or chamomile tea. See the icing notes below for options.
- Honey – a natural sweetener.
- Tapioca Starch, Cornstarch, OR Arrowroot Powder – to thicken the icing.

Ingredient Notes and Substitutions
There are several ways to adjust this dog cookie frosting recipe depending on what ingredients you have available.
Do not use peanut butter with xylitol because it’s toxic to dogs. Always check the label!
You can swap peanut butter for almond butter or sunflower seed butter, just make sure they’re also xylitol-free.
You can substitute applesauce with mashed banana or plain pumpkin puree.
If you don’t have oat flour, you can make your own by blending uncooked old-fashioned oats until they reach a flour-like consistency. 1 cup of oats makes about ¾ cup of flour.
Equipment Needed
While you may have most of the kitchen items you need to make these cookies. You can use any regular cookie cutters, but dog bone or paw cutters make cute cookies.
How to Make Dog Cookies with Icing
Making this dog cookie recipe with icing is simple and similar to making decorated cookies for people. Here’s what to do:
Make the Cookies
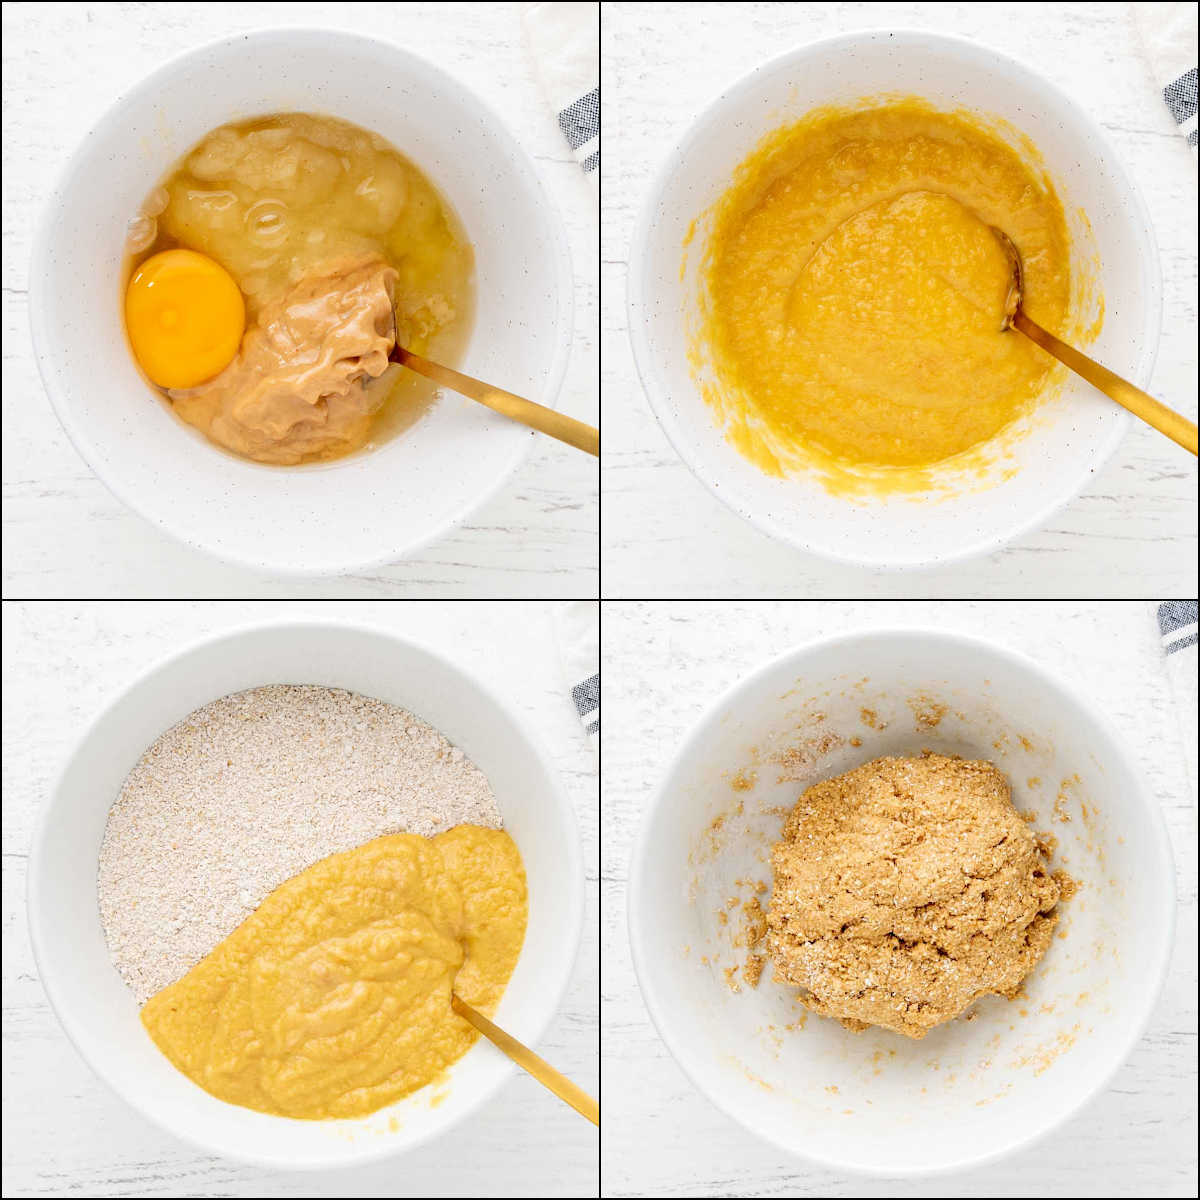
- Place the peanut butter, applesauce, egg, and coconut oil in a bowl.
- Combine the wet ingredients with a mixer or by hand.
- Add the oat flour to the wet ingredient mixture.
- Combine well to make the dough.
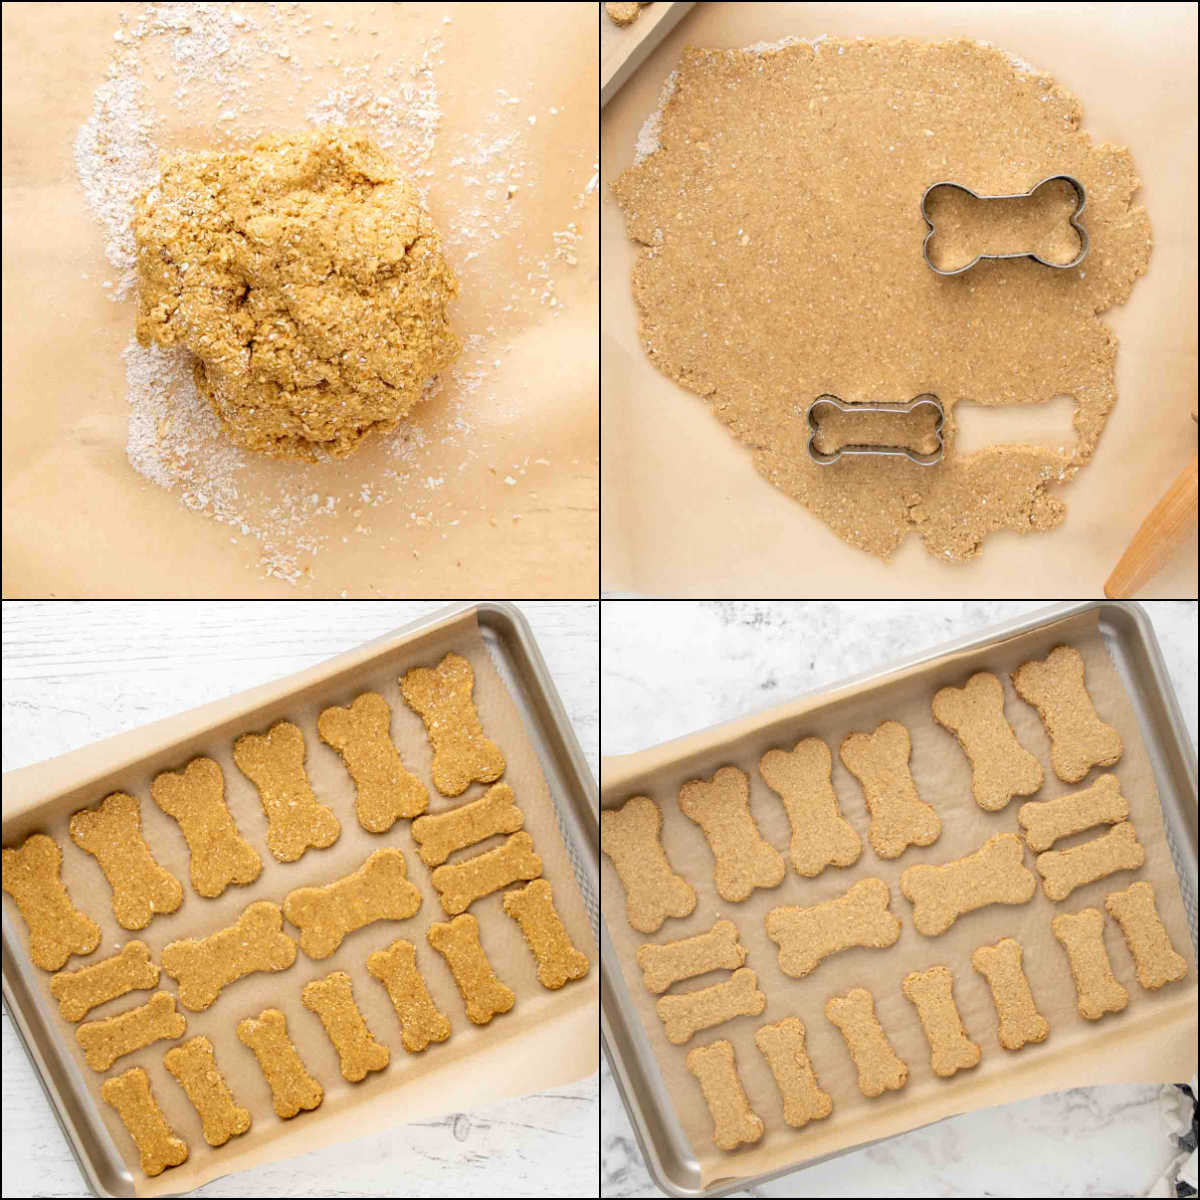
- Roll out the dough on a lightly floured flat surface until about ½ inch thick.
- Using your favorite cookie cutter, cut out as many shapes as possible. Gather the scraps, re-roll, and cut out the cookies until all the dough is used.
- Place the cutouts on a baking sheet lined with parchment paper.
- Bake for 20 to 25 minutes.
- Transfer the baked cookies to a wire rack to cool completely.
Make the Dog Cookie Icing
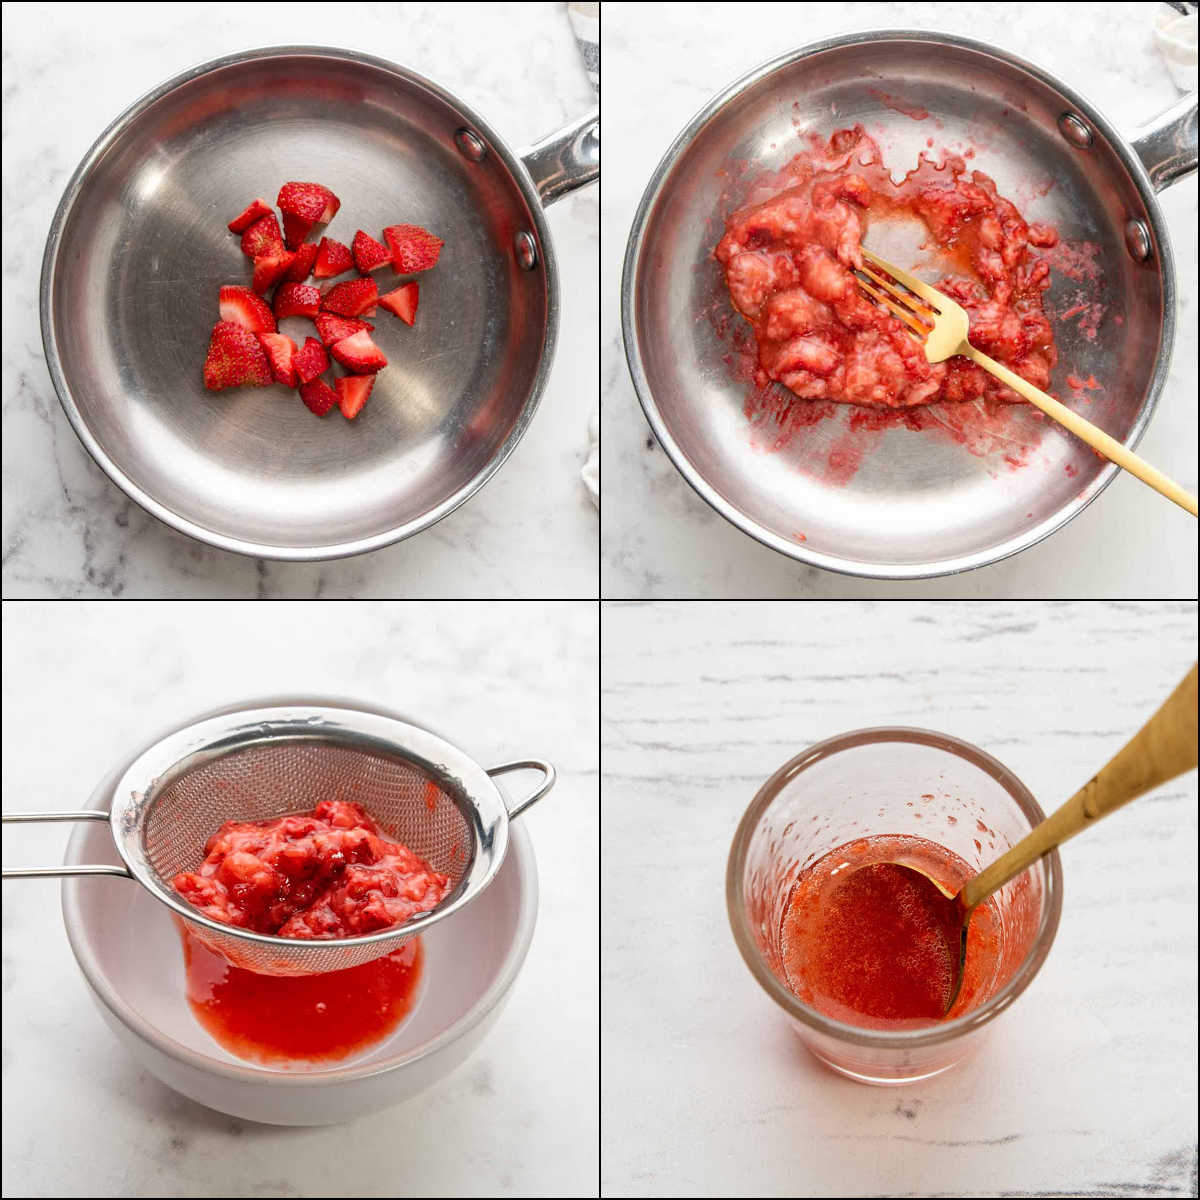
- If using fresh or frozen food, lightly simmer about ¼ cup in a small pan on the stove until the juices are released.
- Strain the juice from the pulp into a small bowl. Discard the pulp.
- Add enough water to the juice until you have 2 teaspoons. If you want the color to be darker or lighter, use more or less juice in the juice/water mixture that makes up the 2 teaspoons of coloring liquid.
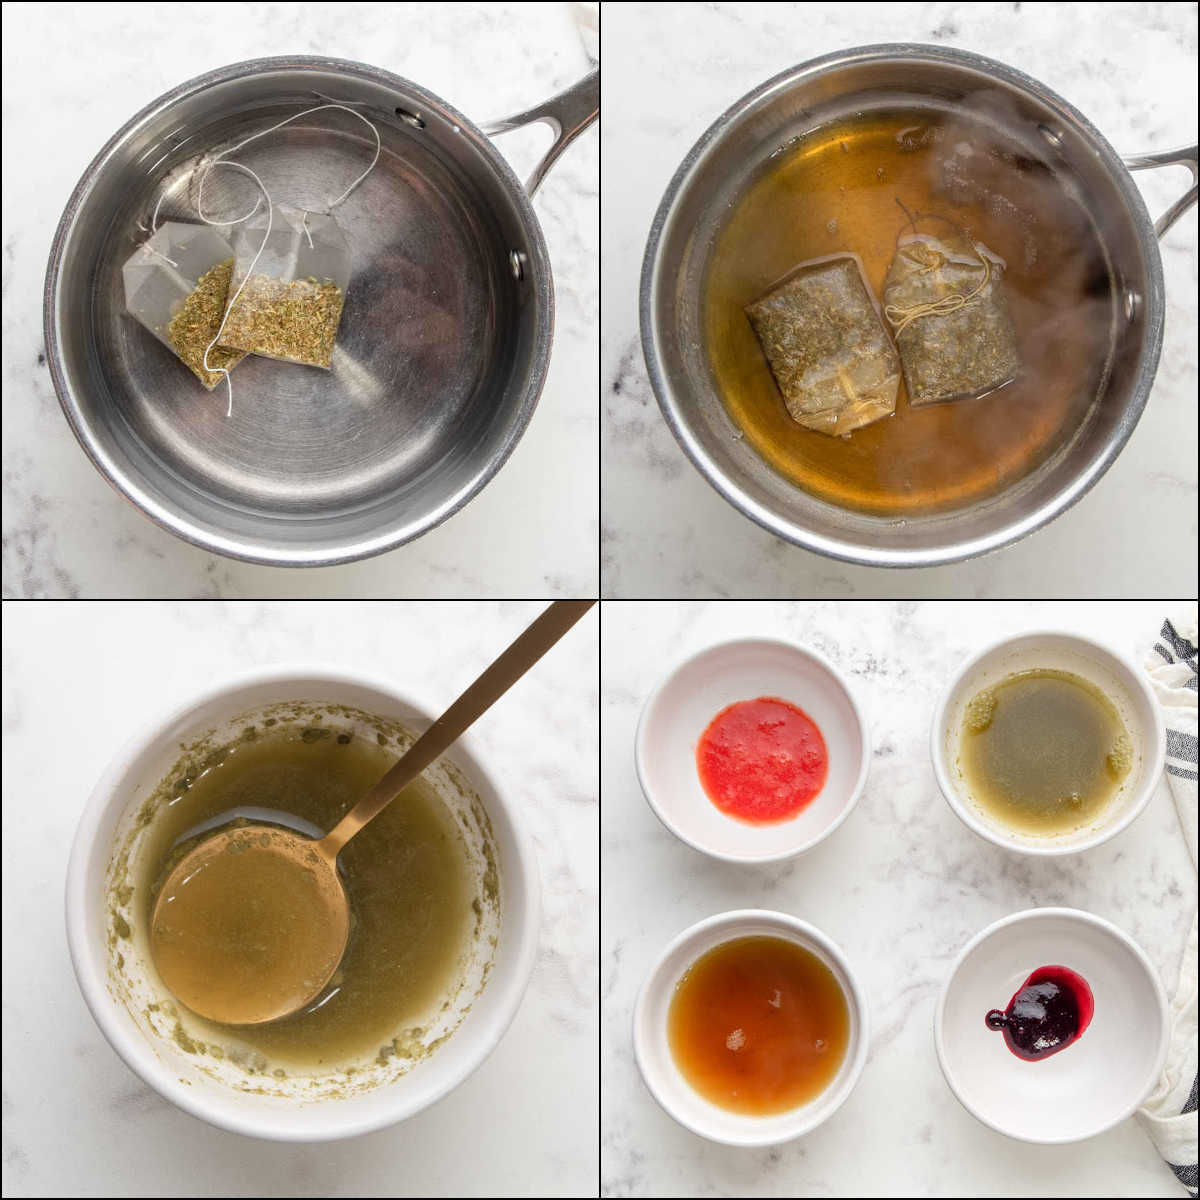
- If using chamomile tea, boil two tea bags in 1 cup of water until the water reduces by at least half and the color is dark. Use 2 teaspoons of reduced tea for the color.
- If using a powder, mix a small amount of it with at least 2 teaspoons of water. Use two teaspoons of this mixture for the color.
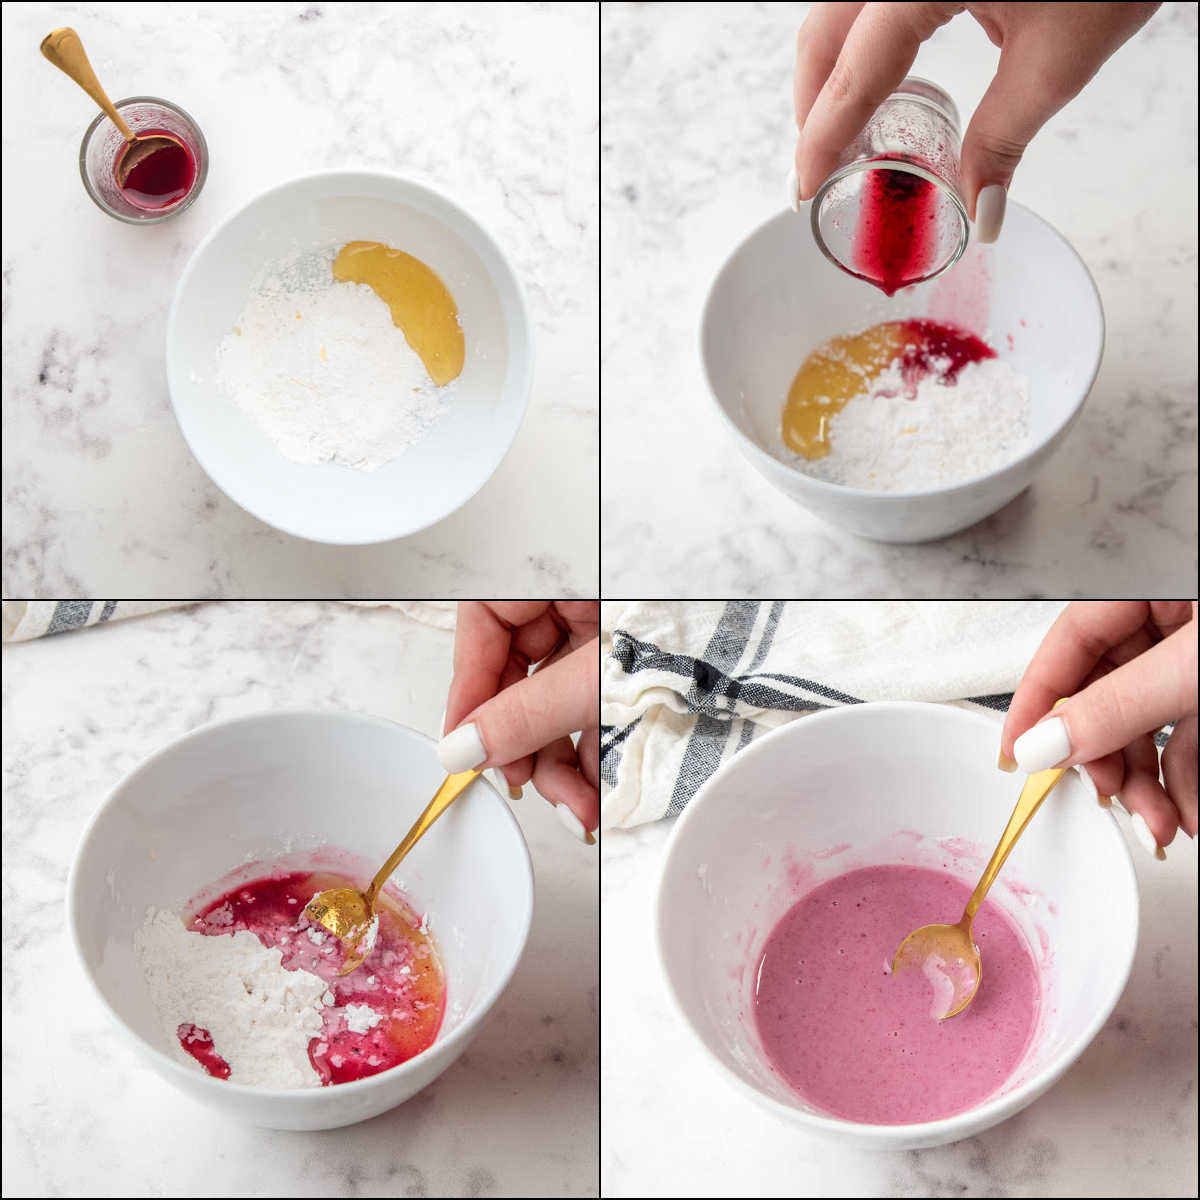
- Place honey, 2 teaspoons of coloring liquid, and 2 tablespoons of thickener (either cornstarch, arrowroot powder, OR tapioca starch) in a small bowl.
- Stir until well combined and smooth. You may need to add another tablespoon of the thickener to the mixture to get the texture you need.
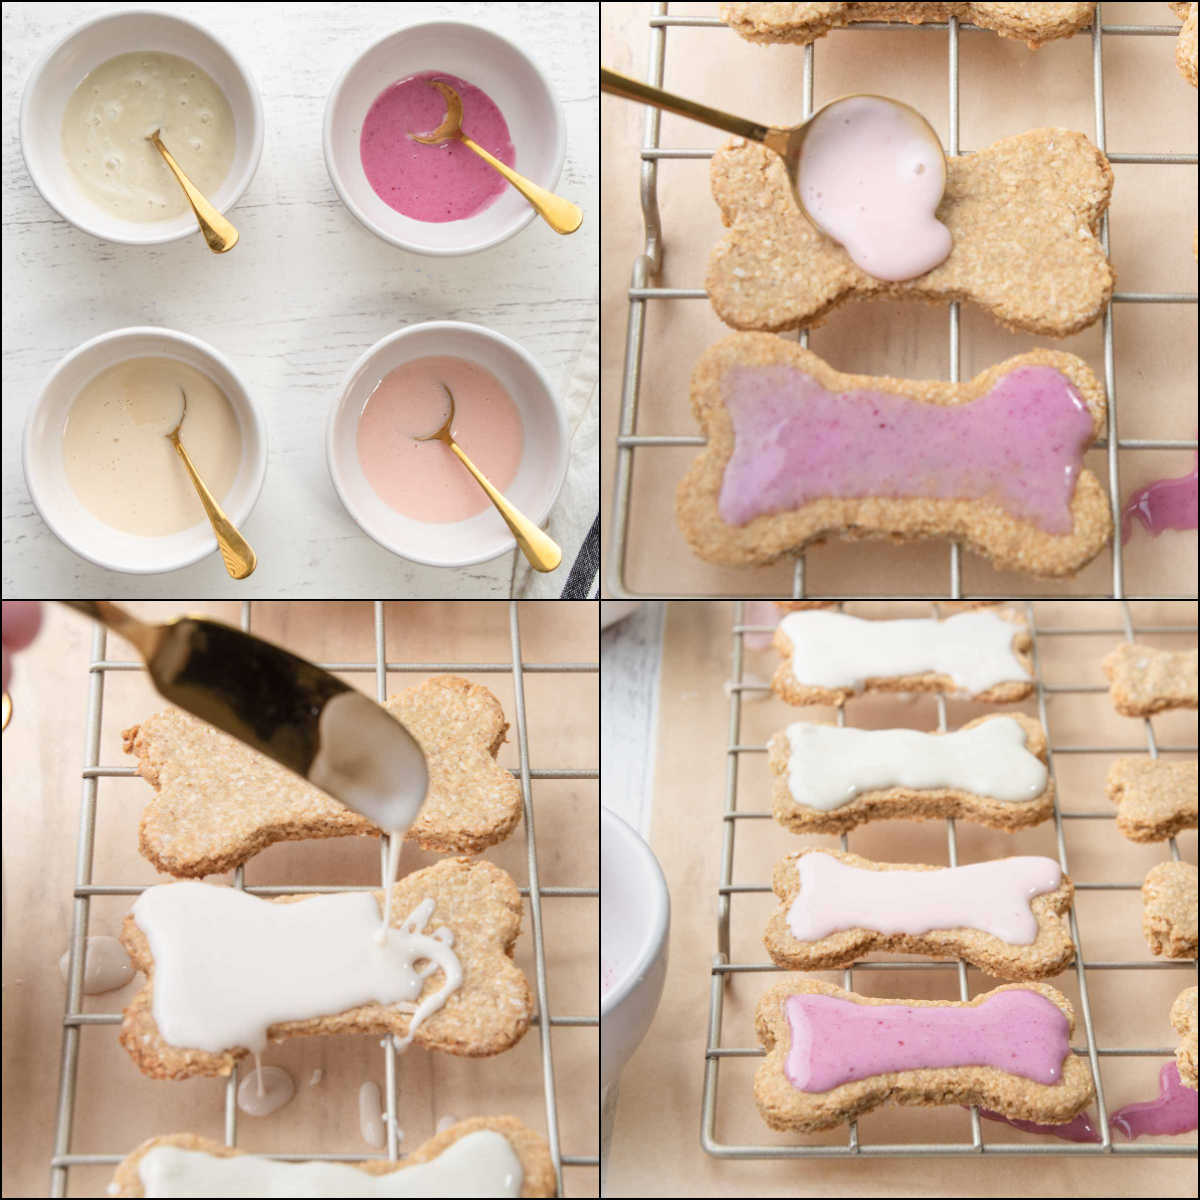
- Use a spoon or knife to drizzle the icing over the cookies.
- Allow the icing to set up and harden. This should happen fairly quickly.
Icing Notes and Tips
This icing is not the same texture that you are accustomed to with royal icing for cookies. It seems runny, but it hardens quickly. It has a slightly different texture than traditional royal icing.
The icing will set, but may still smear if handled roughly or when stacking cookies. If you want the icing to dry harder like royal icing, bake the decorated cookies at 170–200°F for 10–15 minutes. This will also make the cookies crunchier and extend their shelf life.
Natural Color Options
You can make a natural coloring liquid using fruits, vegetables, teas, or food powders.
- Berries – Blackberries, Blueberries, Mulberries, Raspberries, or Strawberries
- Vegetables – Beet, Carrot, Sweet Potato, or Tomato
- Food Powder – Beet, Carrot, Spinach, Moringa, Purple Sweet Potato, Red Cabbage, or Spirulina.
- Tea – Use chamomile tea
To make the icing in the photos, I used 3 strawberries, about ¼ cup blueberries, 1 teaspoon moringa powder mixed into ¼ cup water, and boiled two chamomile tea bags in 1 cup of water until reduced.
What about regular food color?
Regular food coloring contains artificial colors, dyes, and sometimes a sugar substitute or artificial sweetener. These can be harmful to dogs.
You can get plant-based dog-safe food coloring powder on Amazon. Just mix it with water according to the package instructions.

How to Store the Cookies and How Long They Last
Place the cookies in an airtight container with wax or parchment paper between the layers. They can be stored on the counter, in the refrigerator, or in the freezer.
These cookies will last 7 to 10 days on the counter or in the fridge. Frozen cookies will last up to 4 months.
Can people eat these cookies?
Why yes, they sure can! Everything in these dog cookies is safe for human consumption. The cookies are lightly sweet and crunchy, and the icing adds a hint of natural flavor. They’re great for those who are watching their sugar intake. Give one a try, and you might like it.

More Homemade Dog Treat Recipes
Want to make more cookies and peanut butter treats for your dog? Check these out:
- Christmas Cookies for Dogs
- Frozen Peanut Butter Dog Treats
- Oatmeal Cookies for Dogs
- Peanut Butter Banana Dog Treats
- Peanut Butter Dog Biscuits
- Peanut Butter Dog Donuts
- Peanut Butter Dog Popsicles
- Peanut Butter Pumpkin Dog Treats
- Peanut Butter Smoothie for Dogs
Find lots of easy dog treat recipes here on Spoiled Hounds!

Dog Cookies with Icing
Ingredients
Cookies
- ¼ cup Peanut Butter
- ½ cup Applesauce
- 1 Egg
- 1 Tablespoon Melted Coconut Oil
- 3 cups Oat Flour
Icing
- 2 teaspoons Natural Coloring Liquid see notes below for color options
- 1 teaspoon Honey
- 2 tablespoons Cornstarch or Arrowroot Powder or Tapioca Starch plus more if needed
Instructions
Cookies
- Preheat the oven to 350°F.
- If you don’t have oat flour, blend dry oatmeal in a blender until it becomes a powder.
- Combine the peanut butter, applesauce, egg, and coconut oil in a bowl with a mixer or by hand.
- Add the oat flour and combine well.
- Roll out the dough on a flat surface until about ½ inch thick.
- Using your favorite cookie cutter, cut out as many shapes as possible.
- Gather the scraps, re-roll and form as necessary until all the dough is used up.
- Place the cutouts on a baking tray.
- Bake for 20 to 25 minutes.
- Transfer the baked cookies to a wire rack to cool completely.
Icing
- If using fresh or frozen food, lightly simmer about ¼ cup in a small pan on the stove until the juices are released.
- Strain the juice from the pulp into a small bowl. Discard the pulp.
- Add enough water to the juice until you have 2 teaspoons. If you want the color to be darker or lighter, use more or less juice in the juice/water mixture that makes up the 2 teaspoons of coloring liquid.
- If using a powder, mix a small amount it with at least 2 teaspoons of water. Use two teaspoons of this mixture for the color.
- If using chamomile tea, boil two tea bags in 1 cup of water until the water reduces by at least half and the color is dark. Use 2 teaspoons of the reduced tea for the color.
- Place honey, 2 teaspoons of coloring liquid, and 2 tablespoons of thickener (either cornstarch, arrowroot powder, OR tapioca starch) in a small bowl.
- Stir until well combined and smooth. You may need to add another tablespoon of the thickener to the mixture to get the texture you need.
- Use a spoon to drizzle the icing over the cookies.
Notes
Nutrition
Serving Amount
Treats should make up no more than 10% of your dog’s daily caloric intake to help maintain a balanced diet. And as always, consult your vet if you’re unsure about appropriate portion sizes for your dog.
If your pup has never had any of the ingredients in this recipe, start with a small piece to test for sensitivities.
Thank you from the bottom of my heart. My dog, Savanna, enjoys baking with me and we taste test all of the ingredients and of course she licks the bowl. I like the biscuits due to the lack of refined sugars.
.
Oh wonderful! I’m so glad Savanna is enjoying the treats.
Hi! I’m kind of confused on the instructions. What did you mix for both of the pinks ?
Blueberries made the darker pink/purple and strawberries made the lighter pink.
Thank you for this well thought out recipe.
One questions, can you subsitute AP flour for the Oat? I only ask because I worked for a non profit that sold handcrafted dog cookies as part of their retail, and AP was the only flour donated.
Plz adv
thnx Chef Grace, Overland Park, KS
You can substitute the oat flour with all purpose flour. However note that many dogs have an allergy to wheat so it isn’t the best choice.
Hiie,
Thank you for sharing the recipes my pet is absolutely loving all your treat recipes i recreate
Just one query
How do we obtain blue colour for these chemical free colours?
I suggest using blueberries to make the natural blue color.
Amido de milho pode ser consumido por cães?
Yes, dogs can eat cornstarch.
When I make the icing, I use arrowroot powder, it always dries speckled or spotty. It doesn’t look very good but I like how the icing does harden up. I have made it a couple times and it’s the same each time. Am I doing something wrong?
Try using a whisk to mix the icing or a small blender or food processor (like a spice grinder). That may help it be smoother.
Hi, thanks so much for the recipe and the instructions! I’m trying to achieve the same white color for the icing as in your photos but the recipe doesn’t explain how to do that – only the pink one. Did I miss something? How can I make the white icing? It looks so pretty and modern against the pink!
I’m so glad you like the recipe. To make white icing, simply use 2 teaspoons of water instead of a coloring liquid.